Part 1 : Montessori in Limited Spaces

Making Montessori Your Own : Ana's Story

The moment we hear the word Montessori, many of us have flashes of large, fabulous spaces filled with beautiful shelves holding material that beg to be touched and explored. While these pictures may inspire us, they often remain a dream because of practical constraints that hold many of us back such as limited space, budget and other constraints. 

In Part 1 of the series : Making Montessori Your Own, you can read Ana’s simple solutions on how she has made Montessori work in a Limited Space.


Montessori in Limited spaces
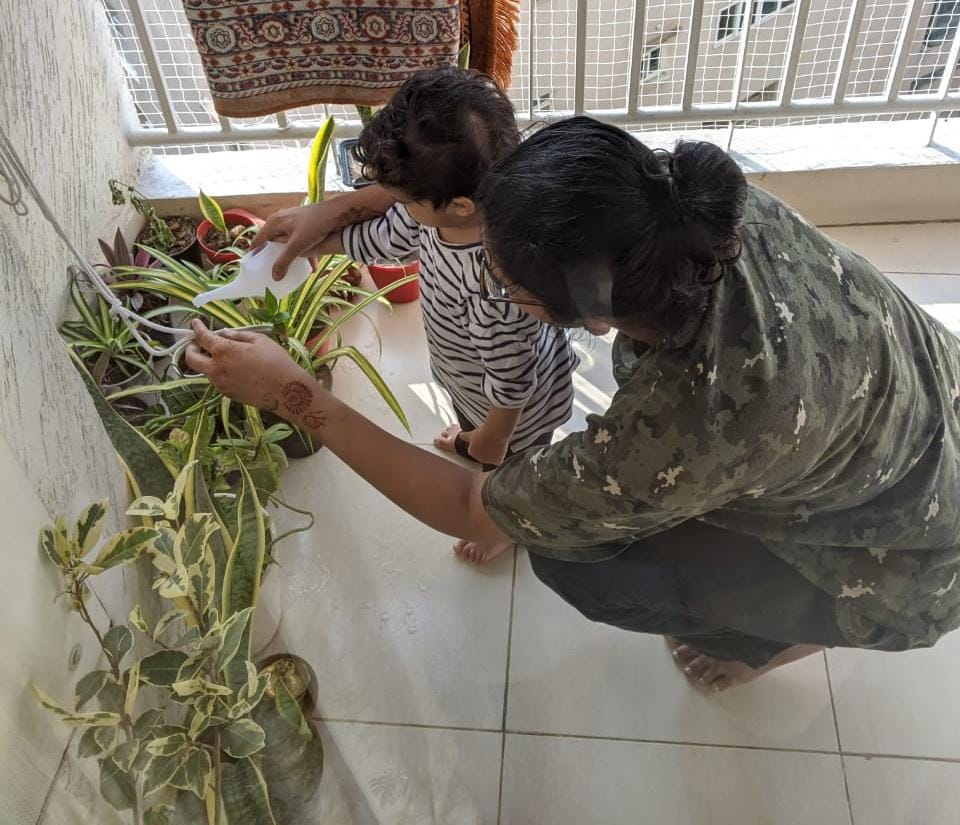
There are 5 of us sharing a 2 Bedroom, Hall, Kitchen (my 21 month old daughter, my husband and his parents) and we’ve been following the Montessori approach since my daughter was 5 months. Living in a limited space hasn’t been a barrier to giving our daughter freedom of movement. Looking back, here are a few things we did that really helped us use the space we have in a way that enabled our daughter to do more.

Foldable yoga mats for play area:  These provide good grip and cushioning while your child is learning to crawl or walk. During naps, or after bedtime, you can stow away the mats and use the space. We’ve actually made rolling mats part of the starting-the-day and clean-up routines that book-end the days.

Foldable Yoga Mats

Use the edge of the mat or breakfast table for shelves: The idea is to have toys accessible to the child in an aesthetically pleasing manner. When my daughter was 6 months old and learning to crawl, we kept her toys in a single line at one edge of the play mat. That was enough to serve the purpose, and we didn’t need any shelves for the limited number of toys (3-5) available to her at the time. Now that we place 6 toys for her, we have repurposed a breakfast table that we’ve had for years. This serves the purpose, and that’s all that matters.

Play.jpeg

Embrace practical life: Whenever you are feeling doubtful on how you can be “more” Montessori or how you can “follow the child” better – think of everything that they typically do in a day and ask yourself if there’s something that you don’t need to do for them, which they can do on their own. It doesn’t have to be (and is very unlikely that it will be) an end-to-end task, especially with toddlers. It can be one sub-step of one part of an activity – maybe just the action of transferring clothes from your hands to the laundry basket – but it is a step the child does on their own and this builds confidence in their abilities. 

PL-energy-balls-e1590596841448.jpeg

Next think of everything that you do in the day – all your tasks – and ask yourself, where can your child help? Think of the simple actions they can do, and where they can possibly fit in your task. For e.g. simple action of pouring pre-measured ingredients into the hand-mixer where they just hold the cup while you guide the action. Anything to make them a contributing member of the family. You’ll find many of these activities do not need extra space – but just some rearrangement of  the existing space, or just look at the same task in a new way. 

Kneel and look at your house from your child’s level:  I learnt this simple trick from themontesorrinotebook and it works wonders. Before you begin setting up an area for your child, get on your knees (to your child’s height), and have a look around. This gives you your child’s world view – do they see underlying cables, sharp edges, bulky furniture? Is the space open and inviting for them? Seeing your house from your child’s height will help you prepare the environment for them. 

Keep books on floors/existing shelves:  We keep a couple of books on the bedroom shelf, and a couple more on the centre table in our living room. We don’t have space for a separate bookshelf, but that hasn’t stopped us from keeping a limited number of books, which are frequently rotated, easily accessible to our daughter. These books are available at multiple spots around the house. You can plan to have 1-3 books each in the bedroom, play area and living room, or any other place  your family spends time together. 

Books

Lastly, if you can make one change, make this one – switch to a floor-bed:  This gives your child control over their sleep and has the added bonus of you not having to worry about them rolling over. For our family, we wanted to co-sleep with the baby in our room, so we chose to move to a floor bed with our mattress on the floor when our daughter turned 7 months old.

Floor Bed

For us, this change required no extra space (other than to store our own bed), but we’ve seen it have a remarkable impact on our child’s freedom of movement. You can make this change when your child starts rolling over and the risk of them falling off their bed begins, and keep it till you feel comfortable. The first night we slept on the floor, I asked my husband, “Remind me why are we doing this to ourselves?” (it was actually my idea), but the next morning, when I saw my daughter practicing getting on and off the mattress on her own, it was all worth it. Now, a year in, I think it has been one of the best modifications we have made to our sleeping set-up and I intend to continue this at least until she is about 2 years old.


Montessori can work in all kinds of spaces & Ana’s story shows us the same. It shows us that Montessori lies in the small things such as looking at the environment from the child’s view, asking ourselves how we can involve the child in our daily lives & making do with what’s available. These simple tweaks, moving to a floor bed or repurposing a breakfast table for a shelf are actually all it takes to help young children explore and thrive.

Making Montessori Your Own : Introduction

Making Montessori Your Own : Ana's Story

I spend a fair share of my time reading, researching, observing and communicating with other parents and professionals on the various ways in which they support their children as they navigate through early, fundamental years. When Ana, a working mother who lives in Gurgaon, India with her husband, her 21 month old daughter and her in-laws found Srishti, we wanted to collaborate together to share with other parents, the different ways in which a parent can make Montessori their own! This has been one of the many fabulous things that has happened to the blog this year. 

In Ana’s own words, “I’m Ana, not a trained Montessori teacher, but a parent who follows a Montessori inspired approach at home with my 21 month old. I’ve learnt, adapted and owned this after reading and practicing this on a daily basis over the last year and a half. What I’m sharing here is based on my experience in hopes that it will help you.” 

Intro photo

Making Montessori Your Own is a six part series in which Ana voices her perspectives, experiences and wisdom which we hope will help other parents in their own journeys. 

Part 1 is titled Montessori in Limited Spaces and includes simple, practical suggestions from Ana on how we can make Montessori work in small spaces. Is it important to have a separate room with lots of expensive wooden materials and plenty of space to make Montessori work? Is Montessori about those beautifully arranged shelves or is there more to it? Ana breaks these stereotypes in this simple article on what really matters when we want to support our children on their road to independence. 

Part 2 is titled Montessori for a Working Mom & How to Involve Your Family in Raising your Child. In this Ana shares her experience as a working mother, and how she collaborates with grandparents and other caregivers to give her daughter the best possible experiences. 

In Part 3, we ask Ana how Baby-Led-Weaning has helped her daughter take charge of eating together with her family, and how the concept of BLW works in an Indian household.

Part 4 is all about Ana’s discovery of Practical Life and how they make it work. In Part 5, Ana talks about the much-feared Toilet – Learning. In this she shares how she introduced the toilet to her daughter, how she transitioned from diapers & guided her daughter towards independence in the toilet. 

Lastly, in Part 6, Ana shares about changes – how they moved cities, how they work from home during the pandemic & support their daughter through all this. 

The idea behind this collaboration is to share with other parents the journey of one family and their child living their lives. In our rapid and busy lives, many of us mean to genuinely help our children but often end up not having the time or perspective to take a step back and really ask ourselves how we can help our children. We hope that peeking into Ana’s story may give us a different perspective on helping our own children on their road towards collaboration and independence. We hope that this series will enrich your understanding of Montessori and inspire you to look at it as a bridge that might connect your child with the world. 

Peeling Cucumbers

Our Little Kitchen

Peeling is a challenging activity that aids young children’s developing muscle strength. The repetitive action of peeling helps them gain control over their fine motor skills and also draws them into bouts of focus and concentration. Peeling not only engages their tiny fingers but also their mind in a constructive activity whilst building judgement and coordination. 

Who is this for?

I would begin around 2.5 – 3 years depending on the fine motor skill of the child. 

Things Required

  • 1 medium sized cucumber/carrot
  • 1 cutting board
  • 1 sturdy and small peeler (I prefer Y peelers) 
  • 1 medium sized bowl for peels 

Preparation

I have observed that children have a better latch over the peel when the edges of the vegetable are cut. This can be done by the adult while the child watches. I also prefer not to hold and guide the child’s hand while they are peeling. This gives adults complete control but a very false sense of ‘peeling’ to the eager child. If you find that you are anxious, increase the challenge gradually by having them collaborate in the process. Also, refrain from telling them how to peel because this shifts attention from peeling to talking. Instead, just show them how it is done and have them repeat after you. 

As always, you are the best judge of what works well for your child in your kitchen! 

Illustrated Guide 

I like to begin with an invitation, “Let me show you how to peel a cucumber today.” Introduce everything at the table, else tell the child what is required and gather them together. 

IMG_3008

Let the child smell, feel and touch the cucumber. Wash the vegetable at the sink and discard the edges. 

IMG_2986

Show the child the peeler. Point to the blade and mention that it is sharp and used only for peeling the vegetable.

IMG_2989

Hold the cucumber down using your non-dominant hand to give support and hold the peeler using full support of your palm and fingers. This gives children better support when they repeat after. 

IMG_2992

Begin at one end of the cucumber and point to the blade touching the peel.

IMG_2994

Exaggerate applying pressure and glide from end to end, pausing in between to watch the peel come off. 

IMG_2998

Place the peeler down and pick up the peel and place it in the bowl for peels. It is nice to point to the color difference where the peel is removed and touch and feel the cucumber. 

IMG_3001

Rotate around and continue peeling. Let the child peel however they can. You can offer to hold the cucumber for support. 

IMG_3005

Once the cucumber has been peeled, the peels can be put in compost. Guide the child to put the other items away or for wash. 

Short Guide

  • I like to begin with an invitation, “Let me show you how to peel  a cucumber today.” 
  • Introduce everything at the table, else tell the child what is required and gather them together. 
  • Let the child smell, feel and touch the cucumber. 
  • Wash the vegetable at the sink and discard the edges. 
  • Show the child the peeler. Point to the blade and mention that it is sharp and used only for peeling the vegetable. 
  • Hold the cucumber down using your non-dominant hand to give support and hold the peeler using full support of your palm and fingers. This gives children better support when they repeat after. 
  • Begin at one end of the cucumber and point to the blade touching the peel. 
  • Exaggerate applying pressure and glide from end to end, pausing in between to watch the peel come off. 
  • Place the peeler down and pick up the peel and place it in the bowl for peels. 
  • It is nice to point to the color difference where the peel is removed and touch and feel the cucumber. 
  • Rotate around and continue peeling. 
  • Let the child peel however they can. You can offer to hold the cucumber for support. 
  • Once the cucumber has been peeled, the peels can be put in compost. 
  • Guide the child to put the other items away or for wash. 

Note : You can also cut the cucumber in half to prevent it from rolling. I have used Persian Cucumbers. Use whatever is locally available. 

Breaking Beans

Our Little Kitchen

Green Beans are healthy, juicy and crunchy vegetables that are rich in nutrients. Very young children, just inducted into the kitchen, find the single step process of breaking beans just enough to challenge and hold their attention. The slender pods of the green beans help the child’s tender hands find strength in breaking them; there is joy in discovering tiny green beans inside. The repetition of the same step helps them gain confidence and a sense of completion of a task from start to finish.

Who is this for?

I would recommend this for children as young as 16 – 19 months. Even if they aren’t walking well, the adult can set this activity up at a table with a seat for the child to challenge their fine motor skills and muscle strength.

Things Required

  • 1 bowl (with a handful of green beans)
  • 1 colander

Preparation

Traditionally, green beans come with a thin string that runs along the seam. If you find this variety, for younger children, it is better to pick pods with the stalk. That way, we can show them to snap the stalk and also pull the string. In this recipe, I have used beans that do not have the string and can just be snapped in two. Also, a point to note is that when beans are steamed, there is usually no need to pull the string.

If you prefer, you are also free to trim the edges of the beans before setting the activity up for the child. In that case, it is nice to show them how you trim the edges. The child can be involved in discarding the edges.

As always, you are the best judge of what works well for your child in your home!

Illustrated Guide

I like to begin with an invitation, “Let us break some beans and steam them for lunch.”  Introduce everything at the table. It is nice to point to the pods and even create an element of surprise on what will be inside when we snap the pods. 

IMG_3110

It is also wonderful to describe some physical properties for children such as “Oh these beans are green in colour, they are slender and long.” etc.

IMG_3118

Show the child to take and hold a pod in both hands.

IMG_3117

Exaggerate applying pressure and break the beans into two pieces.

IMG_3121

Point to the surprise in the pod – the tiny green beans.

IMG_3125

If you find that even after breaking, the beans are long, you can just casually remark, “Oh, this is still long, I am going to make it shorter” and then just snap it again.

Green Beans Extra.jpg

Place the broken beans in the colander. Let the child break beans however they can.

IMG_3129

Once the beans are broken, they can be taken in the colander for washing. Involve the child in putting the used items away or for wash.

IMG_3131

Short Guide

  • I like to begin with an invitation, “Let us break some beans and steam them for lunch.”
  • Introduce everything at the table. It is nice to point to the pods and even create an element of surprise on what will be inside when we snap the pods. It is also wonderful to describe some physical properties for children such as “Oh these beans are green in colour, they are slender and long.” etc.
  • Show the child to take and hold a pod in both hands.
  • Exaggerate applying pressure and break the beans into two pieces.
  • Point to the surprise in the pod – the tiny green beans.
  • If you find that even after breaking, the beans are long, you can just casually remark, “Oh, this is still long, I am going to make it shorter” and then just snap it again.
  • Place the broken beans in the colander.
  • Let the child break beans however they can.
  • Once the beans are broken, they can be taken in the colander for washing.
  • Involve the child in putting the used items away or for wash.

Shifting Positively from NO to YES

Articles

Words are a powerful human tool that have the capacity to evoke either a response or a reaction in another person. They can create a mindset that influences our approach to the world. When someone repeatedly uses negative words, we begin to look at the world through these lens and doubt ourselves, the environment and others. On the other hand, hearing positive words inspire us to act, be kind and open to the world. Yet, with such power at our disposal, how often do we truly pay attention to the words we use and wonder how they impact others in our lives? 

Babies spend the greater part of their first year soaking up life in its entirety. Since they are observant little beings, they occupy a lot of their time watching how the adults around them interact with their environment. This creates in them a fascination and an eagerness to get to know the world. So, naturally, when their bodies are finally able to match their intention, they move towards this wonderful environment they have been eyeing for months, only to hear adults say the word NO! 

What is this NO?

Initially, babies do not comprehend the meaning of this word NO. They look at our facial expressions and hand gestures and stop. When they go back to reaching for the same object and hear the same word a second time, they begin to see a pattern. The curious ones usually try and reach for the same object or a different one, yet again, only to see the adult’s reaction remains consistent for a third time. When our tones and hand gestures become stronger and firmer, some babies start crying because this is not their experience of how we usually talk to them. Some other babies find the whole thing rather amusing and do it repeatedly, much to the annoyance of many adults. Soon enough, all babies begin to understand that more things in their world are NO than YES and begin to grapple with this reality. 

Saying NO

Why is NO a Problem?

To understand this, let us look at what this word actually means. The word NO comes with a lot of power. We ideally use it when we do not wish to persist a situation any longer. It literally means Stop! End! NO! Considering that this two letter word carries so much power, it seems that we use it too casually, too loosely in circumstances that do not even require such authority or intensity. Our children hear the word NO countless times each day. By repeatedly using the word NO, not only are we crushing their spirit but also taking away the real value of this word. So, the problem with NO seems to stem from the frequency and context of usage and not the usage itself. 

According to Dan Siegel, Professor of Psychiatry at the UCLA School of Medicine, “NO leaves you feeling reactive, making it impossible to listen, make good decisions or connect with and care for another person. A focus on survival and self-defence kicks into gear, leaving you feeling guarded and shut down when it comes to interacting with the world and learning new lessons. Your nervous system initiates its reactive fight – flight, freeze or faint response : fight means lashing out, flight means escape, freeze means temporarily immobilizing yourself and faint means feeling utterly helpless.”

What NO does to a Child 

  • Since young children understand their world through exploration, repeatedly using the word NO subtly tells them that the world out there is not for them to explore and understand. Instead of letting them form their own ideas and views of the world, we are essentially passing on our prejudices and preferences.
  • Everytime we unnecessarily stop our children by using the word NO, we are feeding them this notion that the world is a place that holds many threats and dangers. This not only creates too much reliance on another person to navigate through life for them, but also curbs exploration altogether because of fear.
  • The more we throw in the word NO, the more our children begin to feel that they are incapable of handling the world. This leads to low self-confidence, self-doubt and an uncertainty about themselves. 

Dan Siegel, in the book, The Yes Brain : How to Cultivate Courage, Curiosity, and Resilience in Your Child says, “Anything we give attention to, anything we emphasize in our experiences and interactions, creates new linking connections in the brain. Where attention goes, neural firing flows, and neural connection grows. And where neurons fire, they wire or join together. If you’ve been focusing a lot of attention on No! No! No! this is where neural firing flows, a No Brain reactive state.”

Shifting Positively from NO to YES 

  • Fill our children’s vicinity with more YES objects and experiences

Young children are fascinated by the interactions that adults have with their environment. This fascination stimulates action and they gravitate towards these objects. However, we constantly curb such exploration either out of fear or because we cannot manage the mess. Instead, if we rearrange the child’s environment with more objects that they can freely explore, we will make an immediate shift towards a YES environment. Instead of curtailing exploration, we will be aiding exploration and play.

  • Become Mindful of our Words 

When we begin to watch our words and reflect on them, we can take control of the environment we are creating for our children. The next time we are tempted to revert to NO, we can just pause for a moment and ask ourselves why we want to say NO. If a child is moving towards something dangerous, we need to instantly stop them. But, in most other situations, we can divert their attention to something that they can do instead of telling them what they cannot do. A moment of reflection will give us a world of perspective and inspire a more positive response to our children. 

  • Create a YES mindset! 

Our attitude matters! By overusing NO, we not only take away its power but create a NO mindset that holds our children back from the world. By shifting positively from NO to YES, we instil in children’s little minds an attitude of positivity that stimulates openness. What’s better, they begin to trust that they are capable of tackling the uncertain world out there and run towards life with josh, enthusiasm and joy!